


On our house, we have a small side window that lets in hardly any light, and we want to cover it with a wall unit which is where knowing how to brick up a window comes in handy!
It’s also single glazed, and as such, a perfect entry spot for burglars and escape point for heat. That window’s got to go. Luckily, I am a bricklayer, and can do this fairly easily. Even luckier – I’m going to give you my top tips so you know how to brick up a window like a pro.
How to brick up a window – an expert guide
Mucking about with the fabric of your house is a serious business, so make sure you have answers to all these questions before you start.
The job I’m doing is a solid, bare brick wall with imperial brick sizes. Don’t worry, I’m about to explain the jargon. Knowing this at the start affects the gear I’m buying, the tools I’ll need and the techniques I’ll use.
Is the surface rendered, pebble-dashed or bare brick? If your outer wall is rendered or dashed, I’d recommend getting a builder to match the outside surface. You can still do the fun part (the bricklaying), but leave the finish for the professionals. If the surface is bare brick, you’re good to go.
Is the wall solid or cavity? Many older buildings use solid wall construction – a stronger method of building but with a vastly reduced insulation value. In the post-war building boom, cavity walls became the norm, later adding insulation in the cavity to give the walls we have as standard now. You can tell the difference quite easily. If the outside wall is 22-25cm deep, it is most likely a solid wall construction. This means the wall is two bricks thick, so you’ll need to use double the amount of bricks if you’re counting them from the outside. If the wall is closer to 30cm thick, it is most likely a cavity wall, in which case you’ll need to count the number of bricks on the outside skin and build the internal skin with breeze blocks. The gap between the breeze blocks and the bricks makes the cavity.
Are the bricks imperial or metric sizes? When we changed to the metric system in the Seventies, our brick sizes changed too. Old imperial bricks were 9 inches by 4 ¼ inches (225×107.5mm), new metric bricks are 215×102.5mm. They are not compatible, so measure your bricks before you go buying. You can buy both types from most building suppliers, but Imperial is often harder to match for colour.
For bricking up a window, is there a concrete lintel (horizontal support) and do you want to keep it? Windows are vulnerable points in walls that would weaken the brickwork if they weren’t supported by lintels or arches. In cavity wall construction, you will most likely have a steel lintel with a facing brick on the front of it that matches or complements the rest of the wall – leave this in.
If you have a concrete lintel over your window, you have the option of taking it out and re-filling the space with bricks. Now lintels are deceptively heavy, so be careful. Do not attempt to take one out without professional advice if your window is more than 70cm wide. If you do want to remove the lintel, I’d wait until you’ve laid bricks up to within two courses of the top of the window. Then, use a masonry drill bit mounted in a hammer drill to carefully rake out the mortar surrounding the lintel. Avoid hitting your wall with a hammer, as this will dislodge some of the bricks that the lintel is holding back.
Once the lintel is free, take it out and continue building up to the top. Even with the most skilful of raking out, you may still dislodge a couple of bricks above the lintel. Knock off the mortar from these and build them back into the wall.
How to brick up a window – tools
Once you have established what you’re going to be building and counted your bricks, it’s time to go shopping! You will need the following :
- Hammer, wood chisel and panel saw (to get the old window out)
- Brick trowel
- Pointing trowel
- String
- Masonry nails
- Club hammer
- Bolster (for cutting bricks)
- Hammer drill with a masonry bit
- Shovel
- Bucket
- An area for knocking up mortar
- A jointing tool, or a small piece of 15mm copper pipe
- A soft brush – paint brush or dustpan brush will be fine
- PPE Gloves, and goggles
How to brick up a window – materials
- Bricks (counted by using the rest of the wall as a guide – remember to use double if it’s a solid wall)
- Breeze blocks if required
- Cement – one 20kg bag per 0.75m2 of a single skin brick wall. Remember – cement is the grey dusty stuff and mortar is cement plus sand and water
- Soft sand (sometimes called building sand) 2x25kg bags per 0.75m2 of a single skin brick wall
- Plasticiser – an additive that makes the mortar easier to use.
How to brick up a window – step-by-step guide
Time needed: 1 day
Step-by-step guide on how to brick up a window – from laying bricks to joints and pointing.
- Take out the old window
Time to start getting out the old window. Windows are made of glass, so put your goggles on. If they are wooden, strip off all the mouldings surrounding the windows and carefully release the glass. Then saw, hammer and chisel the wooden frame and sill to remove it. If you have double glazing, you may need professional help, as it’s more complicated to remove.
Use your hammer drill and masonry bit to neatly cut the mortar away from the half-bricks that were cut around the window opening. You are losing these, so gently take them out, as you’ll be replacing them with whole bricks. Remember – if you’re losing the lintel, wait until you’ve got some bricklaying underway before you get it out.
Clean up the new opening and chip off any excess cement around it. - Lay your bricks
Knock up your dry mortar first, in a ratio of three parts sand to one part cement. Once the dry parts are mixed, shovel them into a pile and make a well in the middle with your shovel. Mix in the required ratio of plasticiser (it will tell you how much to use on the bottle) into a bucket of water and pour ‘some’ water in the well. Because the sand you’re using may be either saturated with water, or bone dry, there is no way I can tell you how much water you need to put in, so start with a little and work your way up.
As my old boss (and baking mentor) used to say – “You can always add Rich, but you can NEVER take away!” Mix your water in thoroughly until the mortar easily slips off the shovel, but retains its shape when laid on the ground.
Before you start to lay the bricks, knock masonry nails into the brick joints either side of your opening for the first course, and stretch some string between them. The line of the string will be the guide for laying your bricks. Move the nails and string up as you do each course.
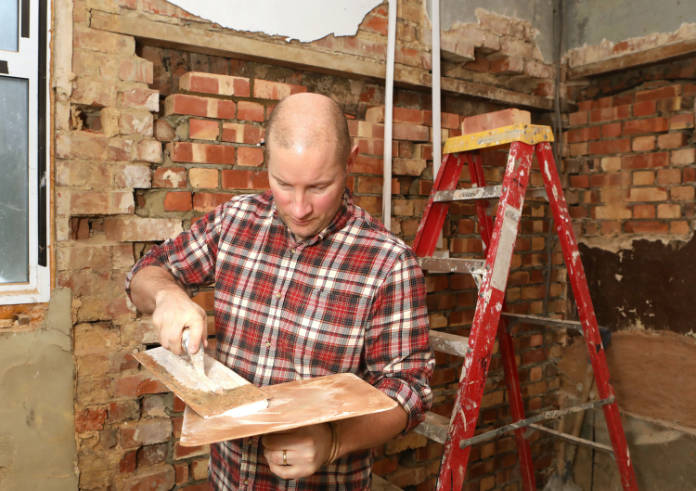
Using your brick trowel, scoop up some mortar and lay it on the bottom surface of your opening. Using the tip of your trowel, move the mortar around so that an even layer of mortar covers the area where you are going to lay a brick. Do not smooth this mortar down – it needs to have a rough surface so that the brick can be laid.
Use your trowel to scrape some mortar on to the side of the brick and lay the first brick in place. This should be a brick on the outside of your wall. Lay the outside course (layer) of bricks first then lay the bricks on the inside. This will ensure your outside edge is neat. However, when you get to the final course of bricks, you’ll need to lay the inside bricks first. When the first brick is in place, gently tap the brick with the butt of the trowel to ease it into position. You have now laid a brick! Keep doing that until you have filled up the hole to one course (layer) of bricks, two bricks deep.
To lay the final course of bricks, you’ll need to lay a layer of mortar as before, and scrape some mortar onto the side of a brick, but this time you’ll also have to scrape a layer of mortar on the top of your brick. Do this and push the brick in place. You will still see a gap in the mortar between the top brick and the rest of the wall. To fill this in, you will need to get a small amount of mortar on your brick trowel and smooth this down into a 1cm layer with your pointing trowel. Lay the brick trowel against the wall with its bottom edge resting on your final layer of bricks, and chop mortar into the open joint with your pointing trowel.
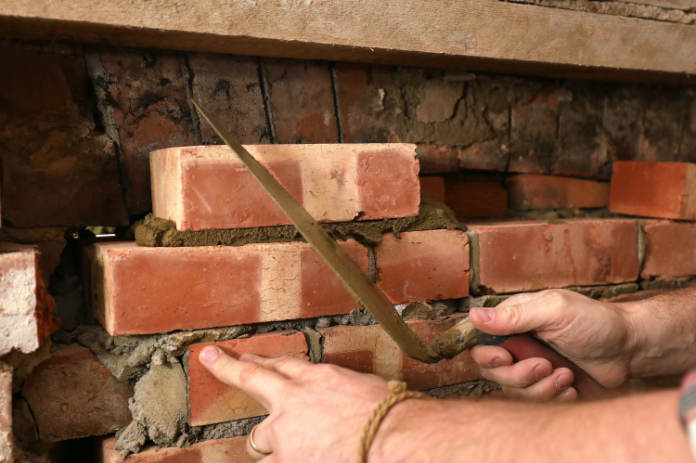
Should you need to cut any of your bricks, lay the brick on a flat surface (the floor outside usually) with the ‘face’ of the brick (the bit you see) facing up. Put the blade of your bolster where you want the cut to go and give it a couple of short, sharp whacks with your club hammer. This may take a bit of practice.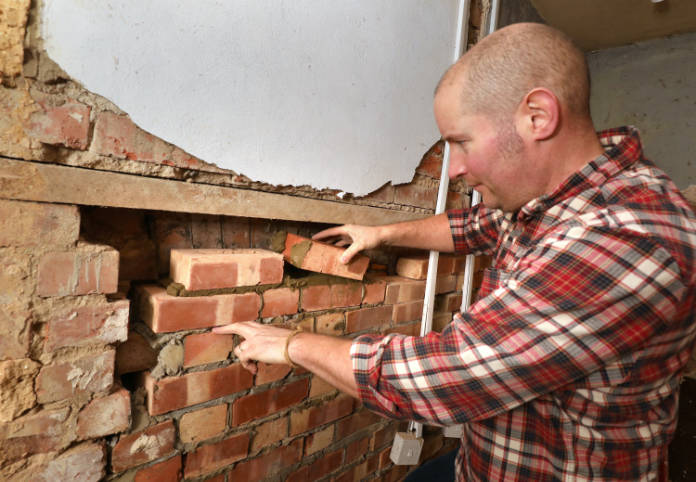
- Finishing bricking up a window
Once your bricks are laid, it’s time to make everything look neat. Using the sharp edge of your trowel, scrape off any mortar that is sticking out of the wall. Using your pointing trowel and brick laying trowel, fill any gaps in the mortar that were missed during the brick laying.
Rub off the edges with either a jointing tool, or some 15mm copper pipe by dragging it along the joints to give a smooth curved surface in the mortar. Next, brush the brick surface with a soft brush, just to soften any sharp or ugly edges in the mortar, then clean up and you’re done.
Happy building!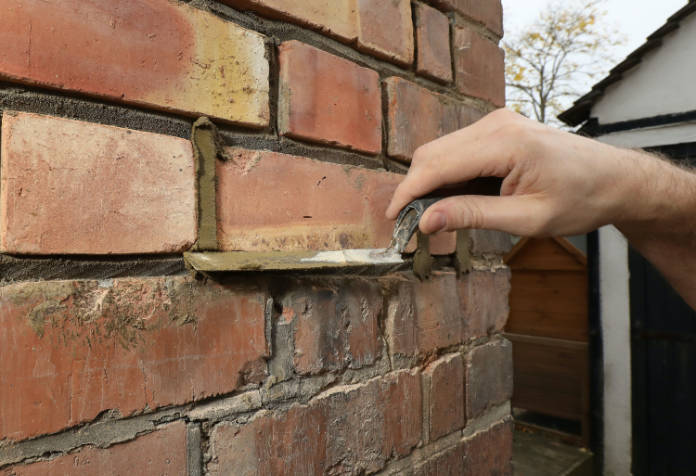


