


“The beauty of these piggies in chocolate is that they are so quick and actually so simple to make, and they taste like chocolate and strawberry dreams wrapped up in a cute pig choux parcel,” buzzes former Bake Off contestant Kim-Joy.
“You can also make these for friends and family and get them to drizzle the chocolate on themselves! Kids and adults alike would love it. And everyone will want to hog them all to themselves!”
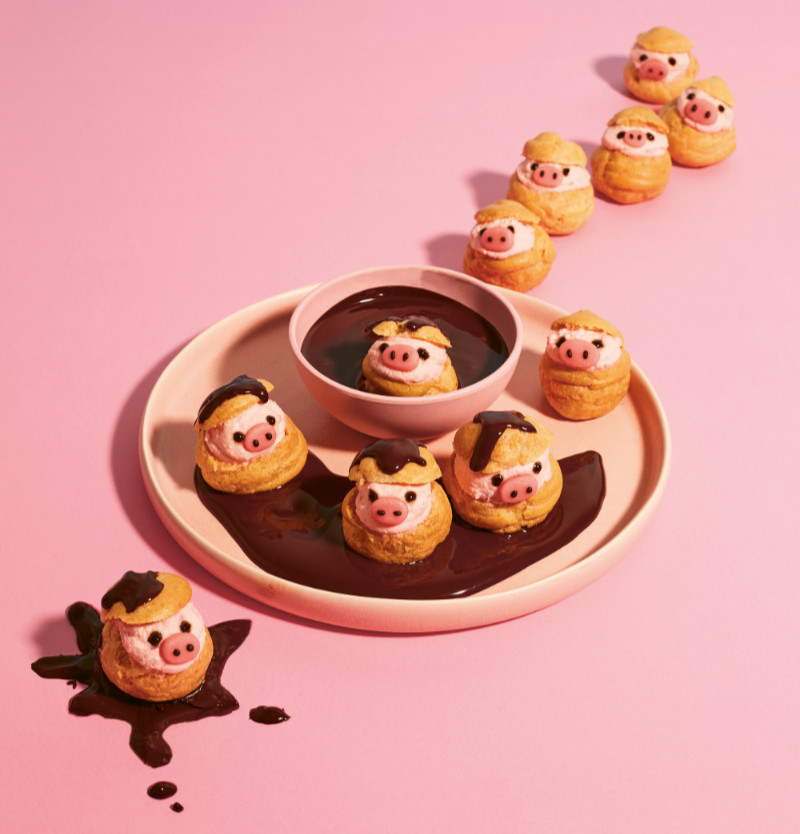
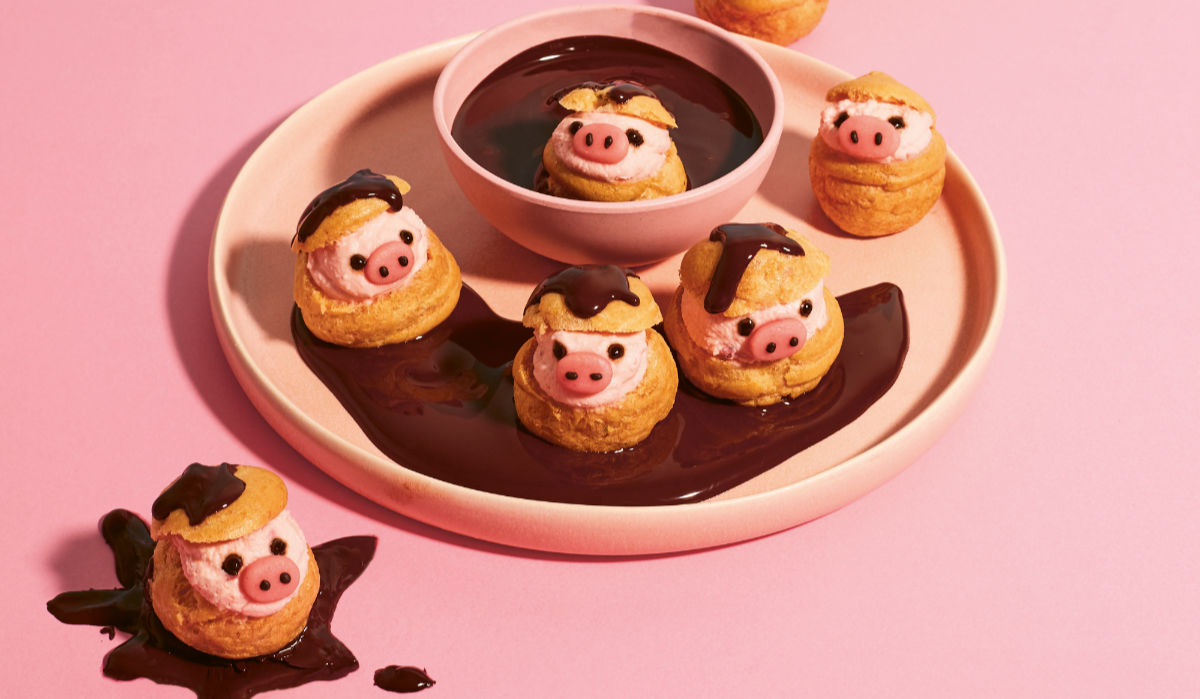
'Pigfiteroles' in mud
Equipment
- Saucepan
- Wooden spoon
- Stand mixer
- Piping bag
Ingredients
For the strawberry filling
- 300 ml double cream
- 2 tbsp icing sugar
- 4 tsp freeze-dried strawberry powder
- pink gel food dye
For the black royal icing
- 1/2 quantity of Royal Icing (see below)
- gel black food dye
Plus
- 1 quantity of Choux Pastry (see below)
- 30 g marzipan
- Pink gel food dye
- Dark chocolate for the mud
For the choux pastry
- 85 g unsalted butter
- 225 ml water
- Pinch of salt
- 50 g plain flour
- 50 g strong white flour
- 3 medium eggs
For the royal icing
- 40 g egg white (or aquafaba for a vegan version)
- 210 g icing sugar
- Plus a little extra egg white (or aquafaba) and icing sugar to adjust and get the right consistency
Method
- Preheat the oven to 200°C/400°F/Gas mark 6. Line a baking sheet with baking paper or a silicone mat.
- Make the choux pastry. Chop the butter and add it to a small saucepan with the water and salt. Heat until the butter has melted and the mixture is starting to bubble. Meanwhile, combine both flours in a separate bowl. When the butter mixture is bubbling, remove it from the heat and add the flours all in one go. Stir with a wooden spoon until it forms a smooth ball that pulls away from the sides very easily – this is called a panada.
- Transfer the panada to a stand mixer (or use a handheld electric whisk) fitted with the paddle attachment and leave to cool for five to 10 minutes.
- Add two eggs, one at a time, to the panada, mixing on slow speed after each addition until combined. Whisk the third egg in a separate bowl and gradually add one tablespoon at a time, mixing well after each addition. You are looking for a glossy consistency that leaves a ‘v’ shape when a spoon is lifted out of the dough. Transfer to a piping bag and cut a medium tip. Pipe about 15 circles onto the prepared baking sheet or mat. Dip your finger in water and use to flatten the tip of the choux.
- Bake for 10 minutes, then reduce the oven to 180°C/350°F/Gas mark 4 and bake for a further 20 minutes. Don’t open the oven until at least 25 minutes have passed, to avoid the choux pastry deflating.
- When the choux buns have finished baking, immediately turn them over and use a knife to pierce the base. This is so that the air inside has somewhere to escape.
- While the choux are cooling, make the strawberry filling. Put the cream, sugar and strawberry powder in a clean, grease-free bowl. Whip on medium-high speed until stiff enough to pipe and hold its shape, but be careful not to overwhip. While whipping, gradually add very small amounts of pink food dye until a pale pink is achieved. Transfer to a piping bag and cut a large tip. Cut the tops off each choux bun, pipe in the whipped cream and replace the top.
- Knead a tiny amount of pink food dye into the marzipan. Shape it into noses for the pig faces and place on the whipped cream.
- Make the royal icing and dye black. Use a stand mixer (or handheld electric whisk) fitted with a balloon whisk attachment to combine the egg white (or aquafaba) and icing sugar until you get a smooth consistency. Then add tiny amounts of extra egg white (or aquafaba) and/or icing sugar to get the right consistency. Add black food dye to colour as desired! Transfer to a piping bag and cut a small tip. Use to pipe each pig’s eyes and two dots for nostrils.
- Melt some dark chocolate in a heatproof bowl set over a pan of gently simmering water. Make sure the bottom of the bowl doesn’t touch the water. Arrange the pigfiteroles in a mud bath of melted chocolate and carefully drizzle some chocolate over the tops to finish off your pigfiterole scene! It’s best to eat these delicious cuties straightaway… not that that will be difficult at all!
Nutrition
Baking With Kim-Joy: Cute And Creative Bakes To Make You Smile by Kim-Joy, photography by Ellis Parrinder, is published by Quadrille.
Wise Living Magazine may receive a small commission to help support the running of this site from purchases made from links on this page. Affiliate links do not influence our editorial or articles published by Wise Living.


